
Congratulations! You’re probably feeling excited about your new smile and the possibilities it offers—but what comes next? How soon can you normally eat again? When can you resume normal activities? What will the dental implant healing stages be like?
These are all questions that come up when getting a dental implant for the first time. As with any surgery, healing can be uncomfortable and irritating. Thankfully, with research and guidance from your dentist, it’s not that hard to get through the process smoothly.
How Long Do Dental Implants Take to Heal?
Dental implants are a permanent solution for missing teeth. They can replace one, two, or more teeth and can last a lifetime. However, certain factors affect how long it takes for them to heal.
The length of time it takes to heal depends on the type of treatment you receive and your body’s response to healing. If you have adequate information about your implant treatment, you can take steps to ensure that your recovery goes smoothly and successfully.
Dental implant procedures can take anywhere from 3-12 months to complete, depending on several factors:
- Whether you need extractions or not.
- The number of implants you receive (single tooth, multiple teeth, or full mouth implants)
- How well you follow post-operative instructions.
- Your age at the time of surgery – Younger people tend to heal faster than older people.
- Your overall health prior to surgery – If you have any health issues or take medications,
it could delay healing or increase your risk of complications. - The placement of implants – People who have implants placed in their lower jaw usually heal faster than those who have them placed in their upper jaw. The reason for this is that bone in the lower jaw is denser than the upper jaw.
- The type of implant material used (ceramic or titanium)
Tip: Get written post-operatory instructions from your dentist before the dental implant surgery. This will help you prepare everything you need to be comfortable during the next few days after the surgery.
You will receive instructions on how to care for your implant surgery site. Follow these instructions carefully to avoid implant failures.
It’s important to remember that dental implants are permanent, and it’s crucial that you take good care of them.
But don’t worry! Before undergoing surgery, you will undergo a pre-surgery assessment to determine if getting dental implants is the best option for you.
Initial Consultation or Pre-Surgery Assessment
Before you even begin the dental implant process, you need to go through a proper surgical assessment or initial consultation. This is to make sure that you are a viable candidate for an implant, and that you have no other medical conditions that would hinder your recovery and healing.
During the assessment, I will review your medical history, discuss medications you may be currently taking, and perform a dental exam.
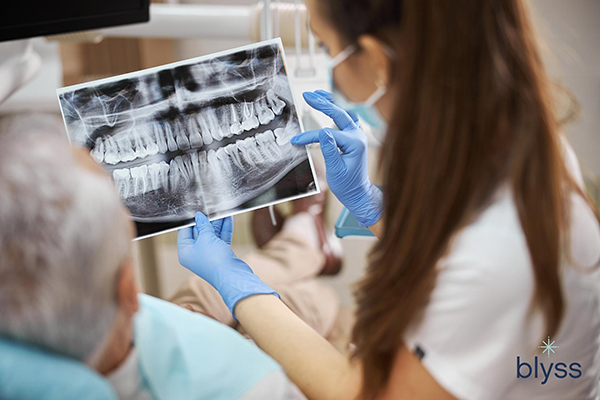
A CT scan or X-ray of your jaw will provide information about bone density, mass, and depth.
This will answer basic questions if you are a candidate for dental implants. These questions are:
- Are you medically fit to have the surgery done?
- Is there anything in your medical history that would interfere with the healing process?
- What are your lifestyle habits like? Does this include tobacco smoking, vaping, etc.?
Any condition you may have such as gum disease must be addressed prior to surgery to promote optimal results.
Relative Contraindications to Dental Implant Surgery
There are some contraindications that may prevent you from getting implants. However, don’t get discouraged if you have any of these conditions. They don’t necessarily disqualify you from getting dental implants. We just need to address these contraindications or get medical clearance before we proceed with the surgery.
Here are some of the relative contraindications of implant surgery:
- Poor dental hygiene. If your gums are inflamed, receding, or have other problems that make it difficult for them to heal around the implant, the implant could fail. We will need to address gum problems prior to or during the surgery.
- Poor nutrition and smoking. If you don’t eat healthy foods or skip meals, drink alcohol excessively or smoke, these can all increase the risk of complications after surgery.
- A history of heart disease or ongoing high blood pressure (hypertension). These conditions can make you more susceptible to infections, which could reduce the success of your surgery.
- Cancer or leukemia. Both can cause a weakened immune system, which can lead to an increased risk of infection. Additionally, cancer and leukemia can also lead to a higher rate of bone loss, which can make implant surgery more difficult and risky.
- Anemia or other blood disorders. Patients with these conditions may be at an increased risk of bleeding and infection, both of which can be serious complications during and after surgery.
- Taking certain medications or supplements that thin the blood (anti-coagulant medications). These include warfarin (Coumadin), clopidogrel (Plavix), aspirin and ibuprofen (Advil).
- Liver Disease. Liver disease can cause problems with blood clotting and the body’s ability to fight bacteria, both of which are important for implant recovery.
- Teeth Grinding or Bruxism. The constant clenching and grinding of the teeth can cause damage to the implants and surrounding bone. In some cases, this damage may be so severe that it renders the implants unusable.
- Bone Loss. You may not have enough bone to place implants if it has been a while since you lost your tooth. Bone loss occurs over time, especially as we age.
- Diabetes. This is a risk factor for implant failure but not a contraindication. Since implant placement is a surgical procedure, delayed healing may hinder implant success. If your diabetes is under control by medication, you’ll enjoy the success and longevity of your implants.
The conditions described have been suggested as possible contraindications for implant treatment and should be managed carefully. In some cases, it may be necessary to delay dental implant treatment until the underlying condition has been sufficiently controlled.
However, with careful planning and coordination between the dental and medical teams, it is often possible to safely proceed with dental implant treatment even in cases where there are contraindications.
Implant Installation Stages
The healing stages may vary according to three common scenarios based on the number of implants placed.
Single Tooth Implant
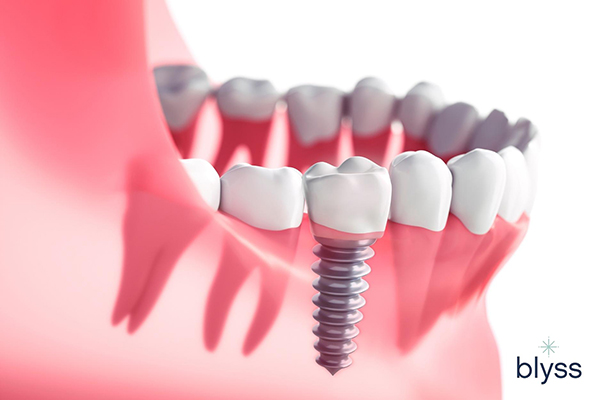
A single implant is placed in the jawbone, and a dental crown is then attached to the implant. This new tooth will look and function just like your natural teeth, allowing you to eat, speak, and smile with confidence.
The surgical procedure for a single-tooth implant is simpler and has a shorter healing period compared to full-mouth implants.
A single-tooth implant is a great option for people who are missing one or more teeth.
Scenario 1: Dental Implant Without Extraction
Timeframe: 3 to 6 months
In this scenario, the patient’s tooth is already missing. If the patient is a qualified candidate, surgery will take place.
Stage 1: Implant Post Placement
The patient will be given local anesthesia to numb the surgical area before the placement of the implant is done. Once the area is numb, the implant dentist will make a small incision on the gums to expose the bone. A hole will be drilled into the bone and the implant will be placed inside. The gums are then stitched back up and left to heal for around 3-6 months.
Tip: At Blyss Dental, I use an advanced technique called 3D Guided Implant Surgery. In some cases, I avoid having to make incisions and stitches. We use a 3D-printed surgical guide that I used to insert the implants right into your jawbone. What’s the benefit? It’s more comfortable. Your healing time is faster with minimal pain. The 3D surgical guide also allows for more precise placement of your dental implant while avoiding errors.
Surgical guides are essentially templates that help ensure that the implant is placed in the correct position. They ensure accuracy and precision during the implantation procedure.
We can also place a temporary partial denture right after the surgery if your missing tooth site is visible. It’s important that you don’t walk out without any teeth!
The first stage of healing begins immediately after surgery when the implant has fused or bonded with the jawbone. This process is called osseointegration.
Post-op Instructions After Surgery
- Do not spit. Use a tissue to wipe your mouth as needed, or swallow your saliva.
- Do not use a drinking straw. Drink straight from the cup.
- Do not smoke.
- Keep fingers and restrain from pushing with your tongue the surgical area or sutures.
- Keep gauze on the surgical area with some biting pressure for 30–45 minutes, replacing it as needed until the bleeding ceases.
- For full mouth implants: Wait to brush and rinse your teeth until 24 hours have passed.
- For single tooth implants: On the same evening as your surgery, brush and clean other teeth normally while being extra careful on the surgical site.
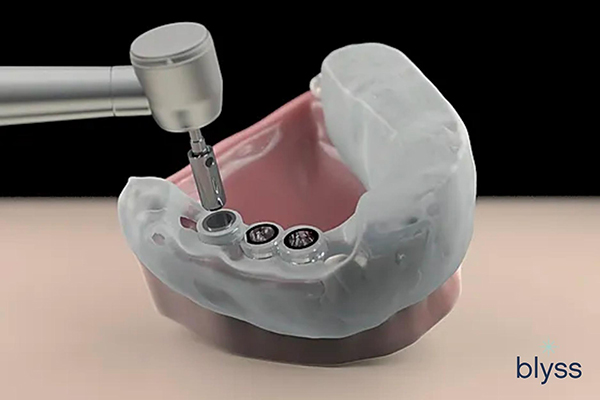
Stage 2: Implant Abutment Placement
A minor surgery to place the abutment will take place once the implant has fused with the bone.
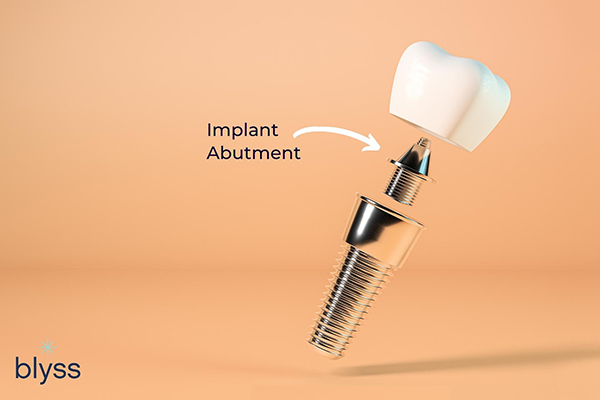
It is important that the abutment be tight against the implant to ensure a secure fit and to prevent bacteria from entering the implant site.
An abutment is a small connector piece that attaches the implant to the dental prosthetic (i.e. dental crown).
The wait time for this and taking your final impressions/scan for crown fabrication takes about 1-2 weeks.
Stage 3: Dental Crown
We take an impression of your teeth after the abutment has shaped your gums.
This dental impression will be sent to a dental lab where the dental crown will be made. In some cases, a temporary dental crown can be placed while you wait for the permanent one to come back from the lab.
After the creation of the dental crown, your dentist will cement or screw it into place.
Related Post: 2022 Insider Tips In Choosing The Best Type of Dental Crown for Your Situation
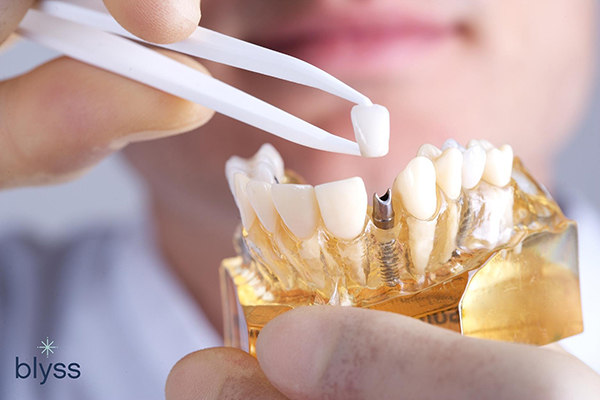
The dental crown matches the color, shape, and size of your natural teeth.
Scenario 2: Dental Implant with Extraction
Timeframe: 8-12 months
In this scenario, one or more teeth to the implant site may need to be extracted and a bone graft procedure is done. Implants require a solid jawbone in which to anchor them in the mouth; so patients without adequate bone must undergo a bone graft before getting an implant placed.
Stage 1: Extraction and Bone Grafting
The patient will be given local anesthesia and the gums will be incised to expose the bone. The implant dentist will then proceed to extract any teeth that are decayed or damaged beyond repair.
After the extraction, bone grafting is done to fill the sockets or holes where the tooth used to be.
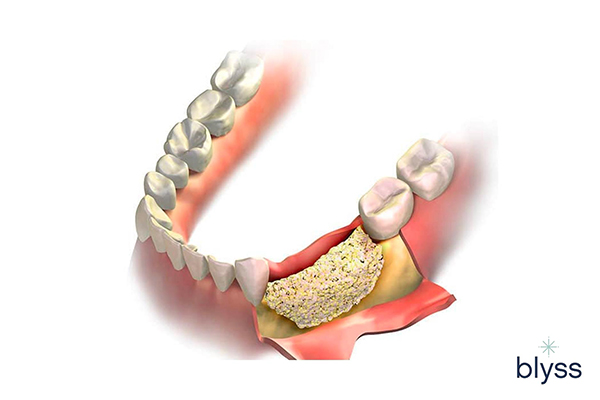
A bone graft rebuilds the jawbone prior to implant placement. While time-consuming, bone grafts can be an essential and necessary part of any implant process.
A bone grafting procedure increases the amount of bone in an area of the jaw where there is bone loss or where there is a need for additional support. The bone may be taken from another location in the body and grafted to the existing bone in the jaw. In some cases, synthetic bone material (alloplast) is used. This helps to create a strong foundation for the implant.
The healing period takes about 3-6 months.
Stage 2: Implant Post Placement
After the healing of the grafted area, the implant post placement is now ready. The dental implant placement process is similar to the one previously described. After the dental implant has been placed, it will be left to heal and fuse with the bone for around 3-6 months.
Stage 3: Implant Abutment Placement
The attachment of the abutment follows the placement of the dental implant post. This abutment will serve as a connector for the dental prosthetic (i.e. dental crown). This stage takes about 1-2 weeks of waiting time for the gums to heal and the completion of your crown’s fabrication.
Stage 4: Dental Crown
Like before, a dental impression is taken and sent to a dental lab where the dental crown is made. The dentist will then cement or screw it into place.
The wait time for the implant with extractions and bone grafting can take up to 8-12 months.
Scenario 3: Immediate Load Implant
Immediate-load dental implants are only suitable for specific situations. In this scenario, the implant is placed right after tooth extraction and bone grafting is done in the same surgery. This will allow for a faster treatment and healing time for the patient.
Stage 1: Extraction, Bone Grafting, and Implant Post Placement
After the tooth extraction, your dentist will perform bone grafting. This is to fill in any holes or sockets left behind and to create a strong foundation for the dental implant.
Immediately after, the dental implant post will be placed into the newly grafted area of the jawbone.
While the implant tooth is fitted soon after surgery, there is no shortcut for osseointegration, and your dental implant still requires the same amount of time (3-6 months) to fuse with your jawbone.
Stage 2: Implant Abutment Placement
The attachment of an abutment to the dental implant post follows after about 1-2 weeks of healing.
Stage 3: Dental Crown
Similar to the first and second scenarios, once the patient has recovered, the dentist will take an impression of the patient’s teeth and send it to a dental lab. The patient is then fitted with a dental crown.
A temporary dental crown can be placed while the patient waits for the permanent one to be completed.
Single Dental Implant Healing Stages Based on 3 Common Scenarios
| DENTAL IMPLANT | IMPLANT WITH EXTRACTION | IMMEDIATE LOAD IMPLANT |
|---|---|---|
Pre-Surgery Consultation |
||
| Implant Post Placement | Extraction and Bone Grafting | Extraction, Bone Grafting, and Implant Post Placement |
| Waiting Period: 3-6 months | Waiting Period: 3-6 months | Waiting Period: 3-6 months |
| Implant Abutment Placement | Implant Post Placement | Implant Abutment Placement |
| Waiting Period: 4-7 days | Waiting Period: 3-6 months | Waiting Period: 4-7 days |
| Installation of Dental Crown | Implant Abutment Placement | Installation of Dental Crown |
| Waiting Period: 4-7 days | ||
| Installation of Dental Crown | ||
Full Mouth Implants
A full-mouth implant surgery is a surgical procedure that replaces all of the teeth in either the upper arch, the lower arch, or both. The number of dental implants required will depend on the patient’s case. The surgery involves the placement of implants in strategic locations in the mouth in order to support a full set of replacement teeth.
Related Post: What Are The Best Full-Mouth Dental Implants For You?
Scenario 1: Full Mouth Dental Implants Without Extractions
I typically recommend the first scenario for patients who need teeth extraction or have lost all of their teeth or patient who is already wearing dentures and are looking for a more permanent solution than traditional dentures.
Stage 1: Implant Posts Placement
The dentist will place the implant posts in the jawbone. The healing time will take 3-6 months.
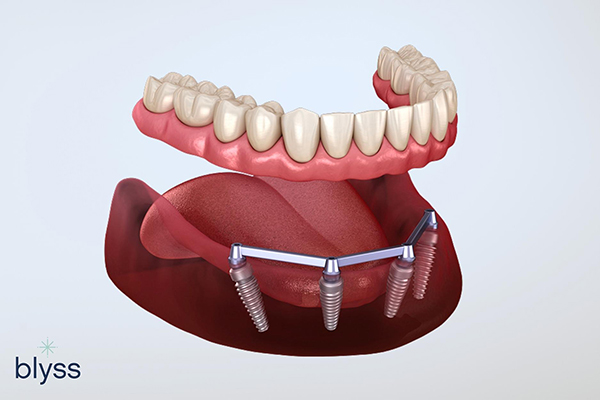
Stage 2: Implant Abutments Placement
After the implants have healed, the patient will need to return to the dentist to have the abutments (connecting pieces) placed on the implants. The healing period will take around 1-2 weeks.
Stage 3: Full-mouth Prosthesis
Once the abutments are in place, the final stage of dental implant surgery involves the placement of a full-mouth prosthesis. This is custom-made and designed to replace all of the teeth in the upper or lower jaw. It can be either removable or permanent.
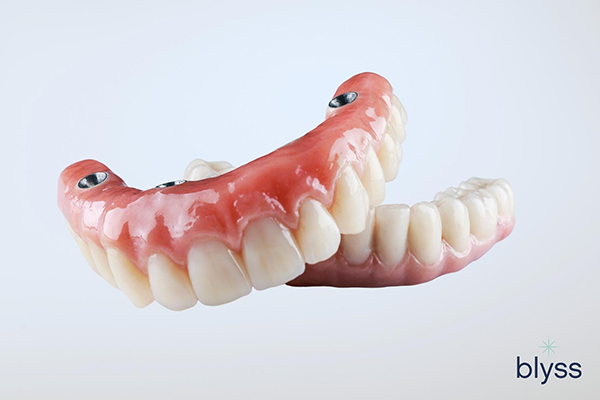
A full mouth prosthesis for dental implants can dramatically improve the appearance and function of the smile.
The prosthesis is then attached to the abutments. They provide support for the prosthesis and help to keep it in place.
Once the prosthesis is in place, it will provide support for chewing and speaking, and it will restore the natural appearance of the teeth.
In some cases, the prosthesis can also support a denture.
Scenario 2: Full Mouth Implants with Extractions
The second scenario of getting full-mouth implants follows the same stages as the second scenario of a single-tooth implant. This includes teeth extraction and bone grafting.
Stage 1: Extractions and Bone Grafting
Your dentist will extract any damaged or decayed teeth and will perform any necessary bone grafting to prepare for dental implant placement.
Stage 2: Implant Posts Placement
The dental implants will then be placed in the jawbone. Healing will take around 3-6 months.
Stage 3: Implant Abutments Placement
After healing, the abutments will be attached to the dental implants. This can take 1-2 weeks of healing time.
Stage 4: Full-mouth Prosthesis
Once the abutments have healed, a full-mouth prosthesis is placed on top of them to replace all of the teeth in either the upper or lower arch. This prosthesis can be removable or permanent.
Scenario 3: Full Mouth Immediate Load Implants
I recommend the third scenario for patients who have lost all of their and need a full set of replacement teeth with less healing time. A single session is all it takes to complete the entire procedure. So, the patient does not have to go through multiple procedures or traditional dentures.
Stage 1: Extractions, Bone Grafting, and Implant Posts Placement
In the first stage, your dentist will extract any damaged or decayed teeth and he will perform bone grafting to prepare for dental implant placement. The dental implants will be placed in the jawbone in the same surgery.
Stage 2: Implant Abutments Placement
The abutments will then be attached to the dental implants, followed by a temporary dental prosthesis placed on top of them.
Stage 3: Final Prosthesis
The healing will take 1-2 weeks. After healing, your dentist will place a permanent dental prosthesis on top of the abutments to replace all of the teeth in either the upper or lower arch.
All-on-4 implants may not be the best solution for everyone. Zygomatic Implants may be more suitable for patients with very extensive tooth damage or who are missing many teeth.
All-on-4 Dental Implants
One of the most common procedures of immediate load implants is All-on-4 Dental Implants.
The all-on-4 dental implant is a type of full-mouth dental implant that can replace all of the teeth in either the upper arch or the lower arch which feels and looks like natural teeth. This involves the placement of four dental implants in strategic locations in the mouth that will support a full set of replacement teeth.
In the zygomatic implant procedure, a full set of replacement teeth is possible by placing one or more zygomatic implants in combination with conventional implants. Zygomatic implants are a type of implant placed in the cheekbone – the zygomatic arch, instead of the bone in your jaw.
The patient will be under sedation during the surgery and the process takes only one session meaning the patient does not need to undergo several procedures and a long recovery period.
Full-mouth Dental Implant Healing Stages Based on 3 Common Scenarios
| FULL MOUTH DENTAL IMPLANTS WITH NO EXTRACTIONS | FULL MOUTH DENTAL IMPLANTS WITH EXTRACTIONS | IMMEDIATE LOAD IMPLANTS |
|---|---|---|
Pre-Surgery Consultation |
||
| Implant Posts Placement | Teeth Extraction and Bone Grafting | Teeth Extraction, Bone Grafting, and Implant Posts Placement |
| Waiting Period: 3-6 months | Waiting Period: 3-6 months | Waiting Period: 3-6 months |
| Implant Abutments Placement | Implant Posts Placement | Implant Abutments Placement |
| Waiting Period: 4-7 days | Waiting Period: 3-6 months | Waiting Period: 4-7 days |
| Installation of Full-mouth Prosthesis | Implant Abutments Placement | Installation of Full-mouth Prosthesis |
| Waiting Period: 4-7 days | ||
| Installation of Full-mouth Prosthesis | ||
Dental Implant Healing Stages: After the Surgery
Maintaining dental implants to last long is key to keeping your smile looking great! After getting implants, it is important to continue with proper dental care. It is crucial to keep the implants clean and free of bacteria in order to prevent infection and maintain the longevity of the implant.
After the Placement of the Implant Post
Patients typically prefer local anesthetic due to the brief duration of the surgery, although patients may also opt for heavier sedation to relieve anxiety. You should be able to drive home safely following local anesthesia, but you will need a ride home if you opt for heavier sedation.
The First 24 Hours
As mentioned in our care tips above, do not spit and do not use a drinking straw. It is important to avoid vigorous rinsing or spitting as it can disrupt the dental implant and cause it to fail.
Spitting, the use of a straw, and poking the surgical area can dislodge the blood clot that is forming and will cause bleeding from the area. Also, smoking can increase the chances of an infection.
Bleeding. Expect some minor bleeding after the surgery. It will usually subside and stop within an hour or two after surgery. Continue using the gauze the dentist gave you with some biting pressure for 30-45 minutes, replacing it as needed until the bleeding ceases.
Swelling. You may experience some swelling after surgery. Note that it may be mild or severe. It may increase for the first 24-48 hours and may last for several days. Apply ice to your face to reduce swelling on a 20-minutes-on/20-minutes off schedule throughout the day.
Diet. You may start with non-abrasive foods such as mashed potatoes, pasta, cottage cheese, soup, or scrambled eggs as soon as the local anesthetic wears off. Avoid eating hot and spicy foods as well as they can irritate the surgery site. You may resume a regular diet as soon as you feel up to it; however, please try not to chew directly on the implant sites.
Oral Hygiene. You may start rinsing the day after the surgery, very gently, with some warm salt water (1 tsp of salt in 8 ounces of warm water). You may brush your teeth per usual using a soft-bristled toothbrush, though be very careful near the surgical sites. Your dentist may also recommend a special mouthwash to help keep the area clean.
Days After the Surgery
Medication. Your clinician will prescribe medication to help you manage the pain. Take all as directed on the bottle. Usually, it is necessary to take narcotic pain medication in a scheduled fashion (every 4–6 hours) for the first 24 hours and as needed thereafter. Remember that narcotics can make you drowsy, so no driving, swimming, operating machinery, or drinking alcoholic beverages while you are taking them. You may wean yourself off of the narcotic medication and substitute 500 mg of acetaminophen (Tylenol® )
For prescribed antibiotics, continue until the bottle is empty. Do not quit halfway. If directed to do so, you may use ibuprofen, 600 mg, every 6 hours while awake, for the first 4 or 5 days.
If pain persists or you experience severe nausea or diarrhea, or cannot swallow your pills, call your dentist.
Regular Activities. Ease back into everyday activities slowly. For some, this may mean returning to work the next day, while others with more physically demanding jobs might need a few days off.
Get plenty of rest and don’t engage in any strenuous activity (including workouts or sports) for three full days or until you’re no longer feeling pain and/or taking medication for it. Go easy at first with exercise and recreation, and increase your activity slowly over several days back to your normal routine.
Sutures. The sutures used during your procedure are typically dissolvable and will fall out without any effort on your part. This generally occurs within the first week after surgery but can take anywhere from 4 to 10 days.
Bone Graft Material. If your surgeon placed bone graft material at the time of the dental implant placement, you might notice some gritty material in your mouth. This is nothing to worry about and should subside within a day or two.
Four to Six Months Into the Healing Period
After your initial surgery and recovery period, the dental implant needs time to heal and fully integrate with your jawbone.
During this period, you’ll continue to maintain good oral hygiene but you can gradually return to your regular activities. You’ll also have follow-up appointments with your dentist to check on the healing process. This integration period is crucial; without it, the dental implant could fail.
Overall, each person’s dental implant healing process will vary based on their individual case and how well they take care of their dental implants post-surgery.
After the Placement of the Abutment
The abutment placement may cause some discomfort and soreness, but it should go away in a week or two. In the meantime, stick to soft foods only for a few days before returning to your regular diet.
After the Placement of the Crown
This procedure doesn’t require any incisions apart from maybe having tender gums and you can resume eating normally after it.
Maintaining Your Dental Implant
Here are some long-term care tips on how to make your implants last a lifetime.
Brush and floss regularly. You need to brush and floss your implants every day just like your natural teeth. Use a soft-bristled toothbrush and gentle circular motions, and be sure to floss carefully around the base of each implant.
See your dentist regularly. In addition to your at-home care, you should also see your implant specialist every six months for professional cleanings and checkups. These appointments provide the chance to check for any potential problems and clean areas that you may have missed with your at-home care.
Avoid bad habits. Don’t use your dental implants to open bottles or chew on hard objects like ice or hard candy, as this can cause damage and potentially lead to implant failure.
Quit smoking. In addition to the numerous health risks, smoking can also interfere with dental implant healing and increase your risk for implant failure. Quitting now can greatly benefit not only your dental implants but also your overall health.
What happens if my implants fail?
In the event that your implants fail, you will need to see your dentist as soon as possible. They will assess the situation and determine the best course of action.
If the implant is loose or has fallen out, the dentist may be able to replace it. However, if the implant has fractures or damages, the patient may need to have it removed. In either case, the close monitoring of the patient’s oral health ensures that there are no other complications.
It is important to keep in mind that dental implants may not last a lifetime. However, with proper care and maintenance, they can last for many years. And yes, many implants last for the rest of the person’s lifetime.
Conclusion
At Blyss Dental, we want to ensure our patients have all the information they need to make an informed decision about their dental health. I’ve outlined what you can expect after getting a dental implant – from recovery to long-term care.
If you are considering dental implants, it is important to be aware of the dental implant healing stages. I can walk you through each step of the healing process and answer any questions you may have.
We want our patients to feel confident and comfortable with their treatment plan, so we provide all the information they need to make an informed decision about their oral health. To learn more about dental implants, contact us to book a free consultation.
7 Sources Cited From
- Garg, Arun K. Implant Dentistry – E-Book. Kindle Edition, Elsevier Health Sciences, 2009, p. 106.
- Ho, Christopher C. K. Practical Procedures in Implant Dentistry. 2021st ed., John Wiley & Sons, 2021, pp. 5–8.
- Penchas, J. (2014). Dental Implants Made Simple. eBookit.com.
- Turkyilmaz, I. (2015, February 25). Current Concepts in Dental Implantology. Intechopen.
- Arnica Dental Care. (2022, July 28). Zygomatic Dental Implants. Retrieved from https://www.arnicadentalcare.co.uk/dental-implants/zygomatic-implants/
- New Business Media – www.nbm.com.au. (n.d.). All-on-4 Implants, Zygomatic Implants & Implant Dentures. Gold Coast OMS. Retrieved from https://www.goldcoastoms.com.au/all-on-4-implants
- Monje, A., Suarez, F., Garaicoa, C. A., Monje, F., Galindo-Moreno, P., García-Nogales, A., & Wang, H. L. (2014, February). Effect of Location on Primary Stability and Healing of Dental Implants. Implant Dentistry, 23(1), 69–73. https://doi.org/10.1097/id.0000000000000019


